9/24/2013 7:56:00 PM by Tara When we tore off the paneling and discovered pine wall boards, I was thrilled. I knew I had to have (at least one) wood wall. My husband did not immediately agree, but I was able to convince him that a feature wall would be amazing.In this photo you see a naïve young woman with a vision. Perseverance, sweat, sanding and varnish would mean that years later that dream came true.
attachments/house.qrimp.com-4223ca22-f538-4464-b4cc-38a32cf6b998/IMG_5417-2.jpg
10/13/2011 11:56:00 PM by Tara We got some tiles at Habitat for Humanity last year. They were a sandy beige color and matched with our countertop quite nicely. Turned out though, that they were the cheap tiles, so they were all slightly different sizes. We ended up not using them on the floor and they've been sitting in the 'big room'.
And we need a backsplash. I'm using the kitchen every day now, and I already noticed a few splashes on the wall behind the counter. Instead of doing regular tile, even those really pretty trendy new small glass tiles (which in 20 years will probably make someone say omg that is so 2010's), I'd like to do something a little artistic.
I've had this idea in the back of my mind to break those uneven 'cheap' tiles into triangular type pieces of different sizes and make a backsplash out of them. I'd also like to put in some of the beautiful 'river rock' that is all around this area. A lot of river rock has a great orangey brown hue that I think will look nice in the kitchen. And they're so smooth and flat.
I'm glad I finally realized this was in my head and got it out. I started looking for images as a backup to prove to PJ that this is a) feasible b)plausible and c) not just some kookamaney idea that his artsy wife came up with.
Here are some of those images, and a few more that aren't like what my vision looks like, just 'cause I liked them so much. :)
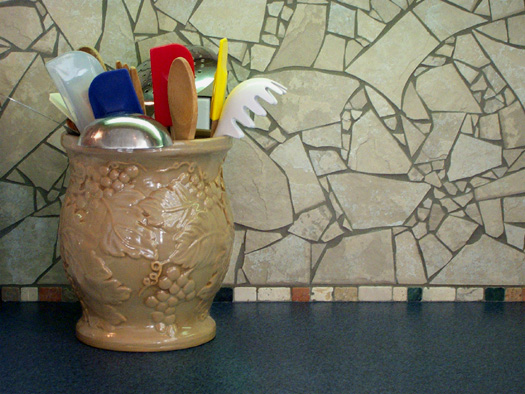


This last one and the USA map one are my favourites.
Hopefully I can get approval for this project! Wish me luck!
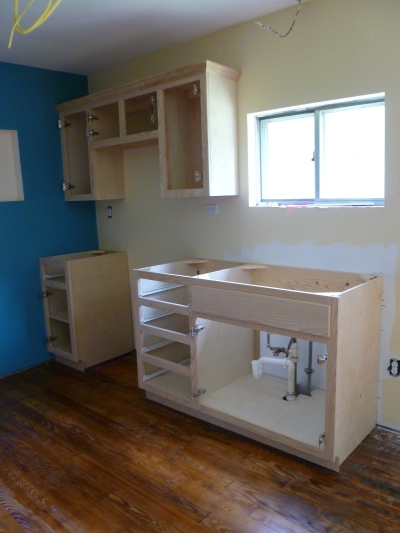
6/24/2011 5:55:00 PM by Tara We ordered our cabinets from Louie Slape Custom Cabinetry. They were ready within less than two weeks.
We chose ash, a very light wood. They installed them for us. Here is what they look like so far.
The reason the doors are not up is because we decided to finish the cabinets (stain/varnish) ourselves. This has turned out to be a LOT of work. I've also included a picture of the cabinet doors and drawers sitting on the floor with their first coat of varnish on. They need three coats and have to be sanded between each coat.
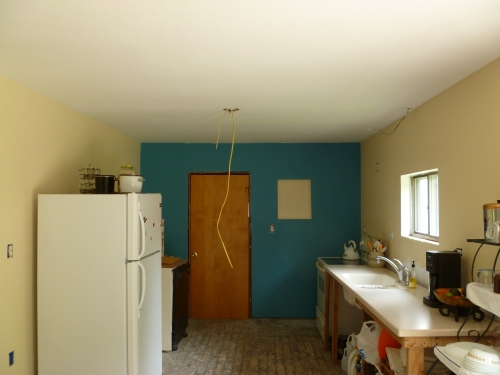
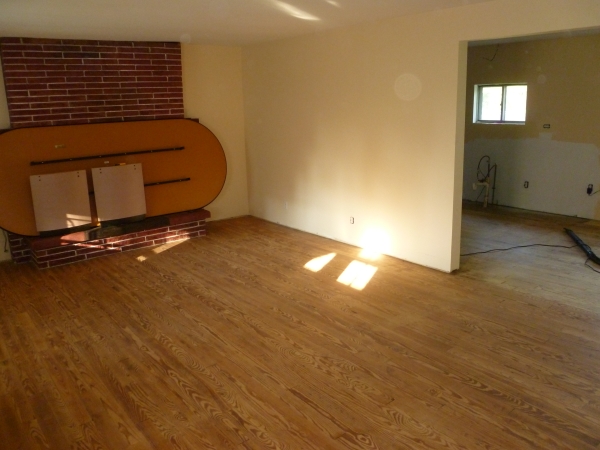
In this last picture, you can see that I also painted the final living room wall a light turqoise color.

6/24/2011 5:45:00 PM by Tara The walls are painted. I did this weeks ago. Here are pictures.
<strong>kitchen</strong>
6/7/2011 1:44:00 PM by Tara In the past month and 3/4s, it feels like we haven't accomplished very much. But we have! Or shall I make that I have? The man has been working in the business, and I've been working on the business of getting this house ready to sell. This summer, we are putting the house back together, and it feels like one step back, two steps forward. (Last summer was deconstruction and it felt like two steps back, one step forward).
We're living there, and it's difficult, but not as difficult as last year. We've had a kitchen sink, and that makes things a lot easier. But we brought out a lot of stuff to enable living and we've been moving stuff around a lot in order to accomplish stuff.
Anyhow, so the next few posts will cover what we've done since May.
Fireplace
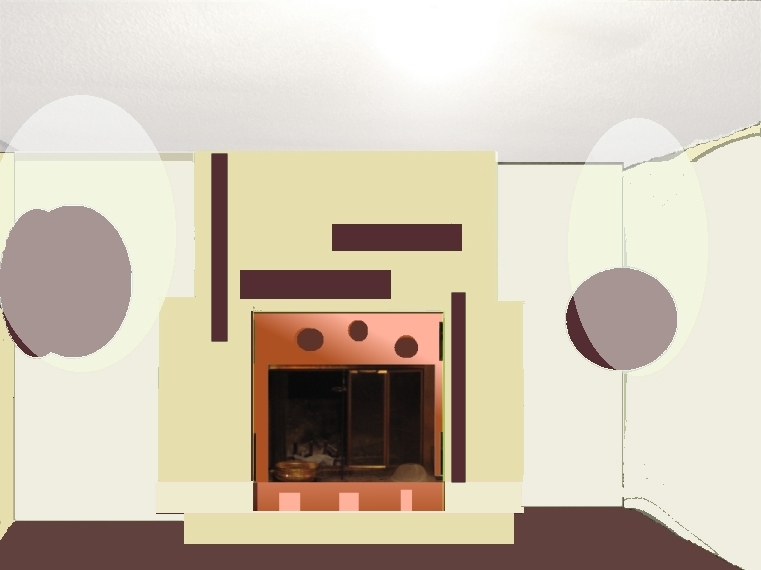
Choosing the colors for the fireplace was really hard. The colors of the fireplace would have to match up with the walls. And we had to come to agreement on the color of the walls. I won't get into this too much, but let's just say we didn't see eye to eye on this. In the end, I drew up waay too many samples of possible color combinations and we drew squares anonymously around the ones we liked. Ones we both liked were entered into the finals. Here are the finals. The top left choice was the winner. I was inspired by paint name colors to name each color scheme. It was fun. One thing that made the fireplace look really good was a circle mirror on the top part of the fireplace. I tried other shapes and this looks the best. Another thing that made the fireplace look good was adding a mantle all the way across the fireplace. I thought it might make it look bigger, but it looks pretty good.
.png)
That decided, I was ready to plunge blindly forward. The general idea was to mix up a few different shades of maroon, splotch them on the bricks to make a few background colors and then coat it with a color. It took about 6-7 hours all together, but this is partly because I used a paintbrush for the first three hours. Then I got wise, put some more plastic on the (already painted) ceiling and rollered the thing. Last stage was to paint the mortar. I was very pleased with the results.
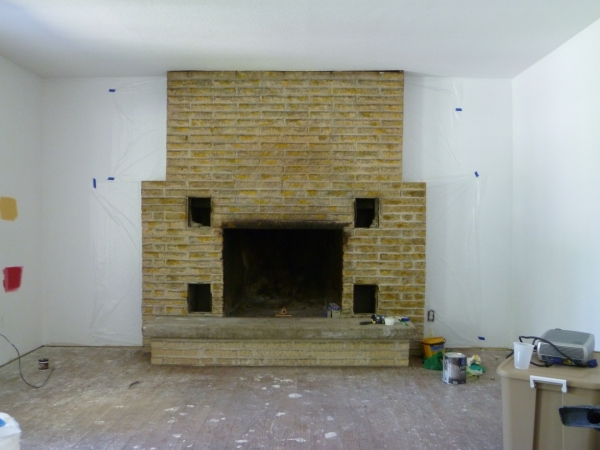
Stage 1
This is the fireplace after I cleaned it.
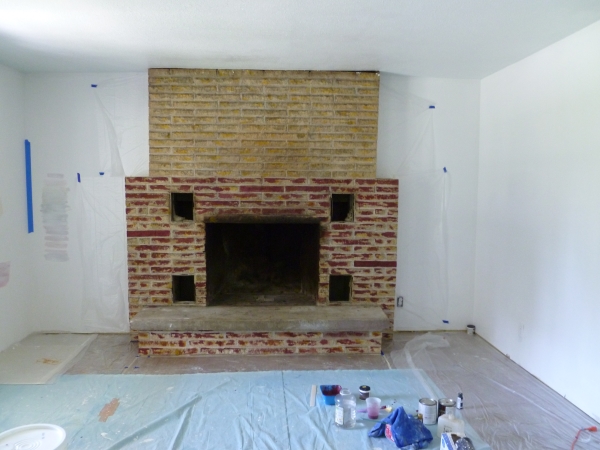
I put some splotches on.
And here it is after I painted the whole thing. I still have to finish the grout lines on the bottom half.
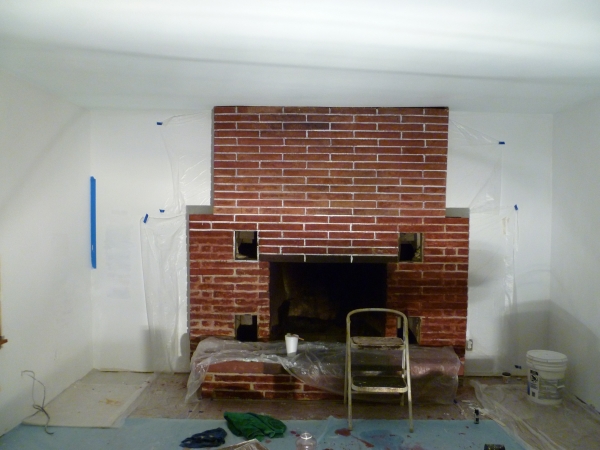
We transitioned pretty quickly to floor sanding, so there is a big table on the hearth right now, but when that's gone, I'll add another pic.
4/19/2011 10:48:00 PM by Tara We went out to the house again today to wait for the plumber (for more on our frozen water pipes, see our previous post: House Redux). The plumber had to reschedule, but while we were waiting, we got quite a bit done. Another round of grass cutting for PJ, with the lawnmower set lower to the ground this time. Oh, and he spent 3 hrs on the phone with AT&T but that's another story. For me, some sweeping. And tidying up. I was really quite pleased, hardly any bugs (of any sort) inside the house. Smelled great almost everywhere, except for where the pipes burst (wet wood). While I was sweeping, I envisioned the walls with drywall on. And paint on the drywall, and kitchen cupboards and sanded/varnished floors and the big ugly stained beige fireplace all cleaned up and...Hmm...fireplace.
Fireplace Ideas
So this: 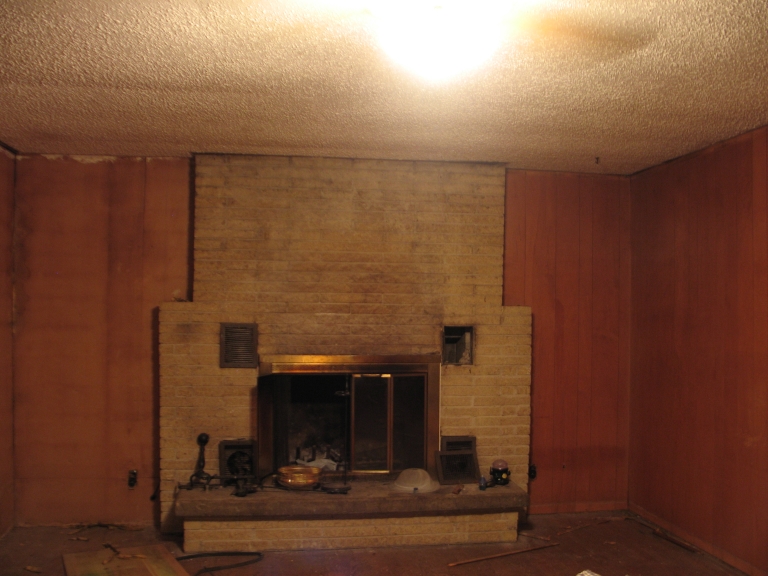
is the fireplace the way it looks now (minus the walls, which have been stripped down to the original wide wood lathes). The wall on the left ends at the edge of the photo. As you can see, the fireplace is very overpowering on this wall. It takes up over half of the wall area, on a wall in a dark corner, with a relatively low ceiling (8', pretty standard). There's also the clash of the horizontal lines of the brick mortar and the vertical lines on the paneling (which is thankfully gone so no more problem there!) I think you'll agree that there's something awkward about the whole thing. My hypothesis is that the width of the fireplace seems to make the ceiling appear lower.
I've thought of a few ways to make the wall look taller and make the area look brighter. We have already decided to paint the walls a very light warm beige. I'm sooo not a beige person, but in this case, I think it's right. This is a north-facing room, so the light that comes in is filtered and bluish. The beige should warm it up and we are pretty set on it, though not the exact tone.
Stain vs. Paint
When doing my research on the internet, I found that a lot of people actually like the light brick look and are restoring their fireplaces to that look using specially produced multi-tint paint kits. As for paint, quite a few people think it's okay to paint a fireplace white (most other colours are frowned upon). A shock white fireplace would be nice, but it would stand out more. Standing out is not what we want for this one. So stain it is. I also like the idea of stain better than paint, because it will keep the natural rough organic textured look for each brick, whereas painted bricks tend to be smoother and glossier looking.
Tone it down...
My main idea to visually minimize the fireplace is to paint or stain the fireplace in the same colour tone as the walls, to (hopefully) make it blend in and feel less overpowering. Using a lighter shade on the walls and a slightly darker shade on the brick should make the walls look larger and the fireplace smaller. Here is what that might look like:
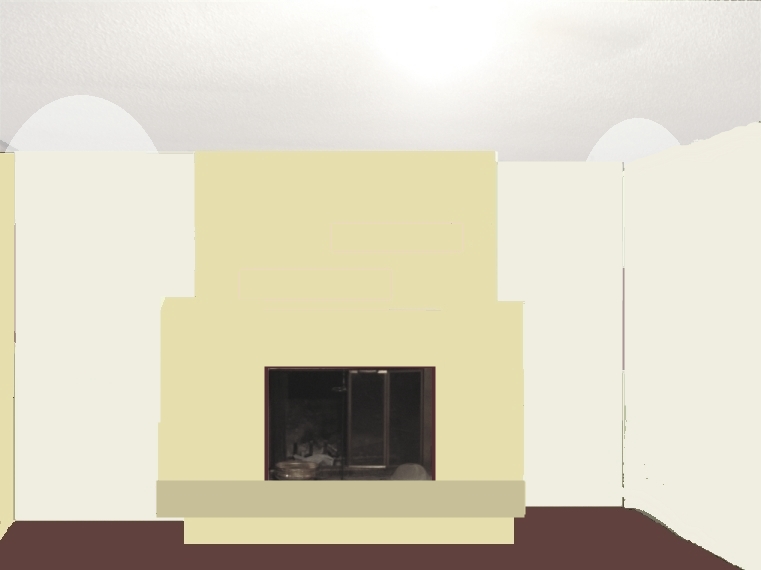
Not too different from the way we found it, except the dark and light colours are inverted, which could make all of the difference in the world to make the fireplace looks slightly smaller. We could also try it with an even darker colour, like so:
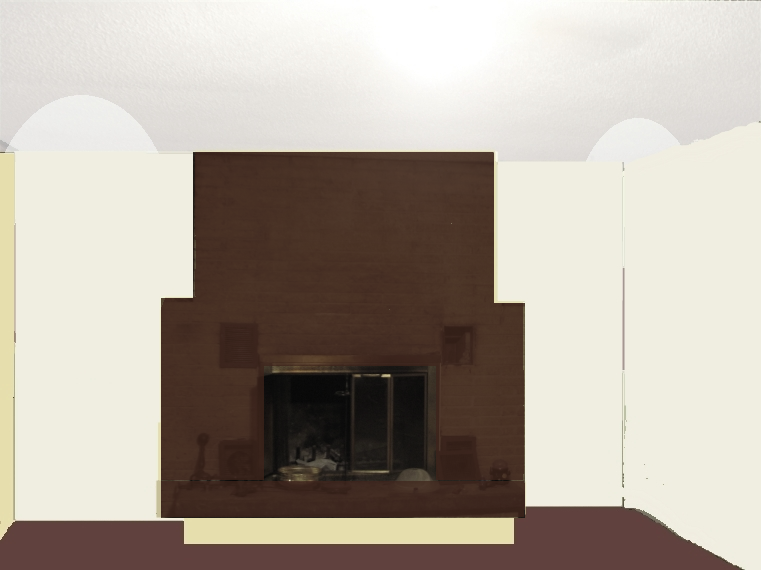
I kind of like this one, but I think light still wins. A dark stain would look rich and cozy, but kind of heavy and it's kind of personal, which probably isn't good for a potential buyer.
And here's what I think will really work to make this fireplace look nice:
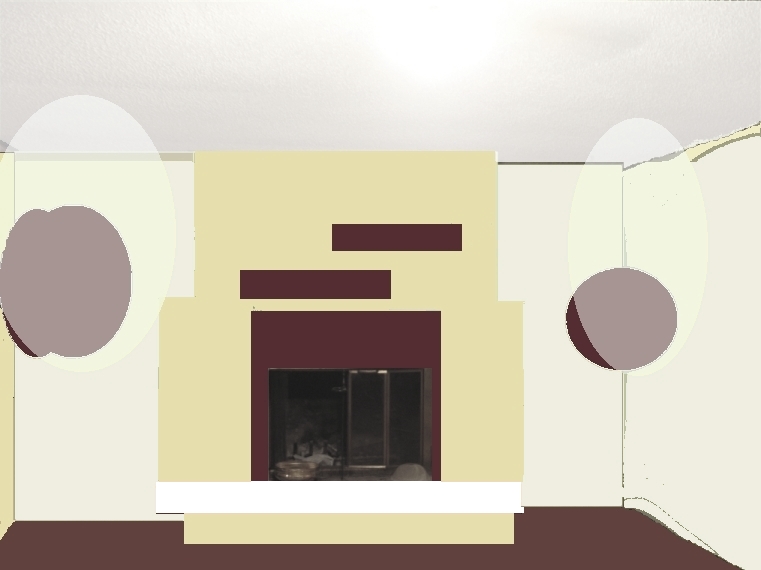
Stain/paint the fireplace a color very similar to the wall. Put two little dark shelves on it to make it less symmetrical and give an optical illusion of height. Add paint or trim or a metal sheet above the fireplace opening to add verticality and cover up the darkest stains. Use different sized lights on either side to distract from the evenness of the behemoth and bring some brightness into this corner!
Or, to get really fancy:
This one is the same as above, but with added vertical stripes (paint? wood? mini shelves? decorations?) to bring the eye up even more. I've also added a fancily painted or metallic fireplace screen, which would carry over onto the hearth and lengthen the lines of the fireplace even more. But the easiest idea is probably what my husband suggested when he came by to see what I was working on. If I want to make the fireplace look slimmer, how about putting it on a diet, or maybe have it do some crunches! Silly! :)
4/16/2011 1:31:00 PM by Tara On Thursday we went back to the house for the first time since last fall. We are going to finish the renovations this year. We cut the lawn, called to have the internet hooked up and went to city hall to have them turn the water back on.
The big plan for the summer is:
Drywall (pay a contractor to do this)
Painting (DIY)
Finish Electric (DIY)
Sand floors (either DIY or contractor)
Install a Kitchen (DIY - get Ikea cabinets from Dallas? or have frames built for the drawers from the cabinets we took out discuss further in later blog])
All of the other odds and ends on our Tasklist (see:
Tasks)
All of this with a deadline of July 30th at the very latest. (We must go back to Canada for a very special couple's wedding) The very special couple contains: my sister and my future brother-in-law :D.
Everything looked and smelled great out at the house on our inspection. That is, until I looked at the bathroom floor and noticed signs of water damage on the linoleum near the vanity cupboard. "It looks like we had a leak". The floor in the hall and in the back bedroom near the bathroom showed some signs of water damage as well. It had obviously been a while since it was cold enough to freeze, (some mold on the raw wood floors). What could we do but finish our tasks for the day and mentally prepare to pay for a plumber!
A few minutes later, while PJ was in the side yard with the lawnmower, I walked out the front door to see the water guy crouching over the water meter with a concerned look on his face. "I'll go check if anything is leaking" I shouted towards him and rushed into the house towards the bathroom. I heard a gushing sound coming from under the house. Not good. I yelled out "Something is leaking" and ran towards the front door. When I got there, PJ was walking towards the water guy. Said water guy then told PJ that when he turned on the water, 8 gallons came out within a matter of seconds.
Water guy turned the water off. We got the good plumber's name off the sticker on the water heater. The plumber will come out on Tuesday. That means we won't start living out there until then. (Edit: we went out today, Tuesday, and the plumber got ...backed up...with work, and cannot come out till Thursday.
8/1/2010 11:44:00 PM by Tara For the past two weeks we haven't been going out to the house much. Some contract work has been keeping us tied to the computer. So in the past two weeks pretty much the only progress at the house has been:
Outdoor outletWe got the outdoor outlet in. It was not as big of a deal or as difficult as expected. We were impressed how actually it looks professional! This must be because of the little vinyl trim piece that the outlet sits in.
Pressure Washing the HouseThe house is clad with off-white vinyl siding. Over the years it has accumulated a certain amount of reddish dust, rust, dirt, spiderwebs and the like. Washing it was pretty high on the list of "curb appeal". We rented a pressure washer for the day ($50) and scrubbed the house down with Krud Kutter and a brush and sprayed it off. I did the scrubbing and PJ did the spraying and by halfway through the day we were already exhausted. The area around the front door was particularly dirty - lots of little scratches that had been filled in with rusty dirt. The scrub brush didn't work. So I had the brilliant idea to try some steel wool and it worked like a charm to remove the stains off the vinyl. Because the rest of the house still had some rusty tinges (especially under the overhang, where the rain never landed) we went over those areas again. We got the house pretty clean. A definite improvement. PJ also pressure washed the old white paint off most of the trim!
The best thing about this day: Even though it was around 90 Fahrenheit all day, the constant spray of water helped keep us kind of cool.
The worst thing about this day: The scrubbing made my shoulder hurt for a week afterwards.
Paint for the fascia boards (trim)We got a 30% off coupon from Sherwin-Williams finally, so I played with the very cool
Sherwin-Williams paint visualizer. The color that looked nicest against the greenish roof was a medium dark grey with a greenish hue called
"attitude grey" (see middle right of swatch). We can only paint when it's below 80, otherwise the paint will dry too fast. It gets up to 80 by about 10:00 am, so we'll have to wake up at the crack of dawn to get to this. Someday this coming week!
Insulation SprayingAnd here is the best part - after much waiting, preparation, research, anticipation, phone tag and a few estimates, we finally got someone out to insulate the house with spray foam. You can see the video for that here:
http://www.vimeo.com/13816739'Nuff said.
Now we can start putting the place back together again!
:D
Thanks for reading and we'll update more soon!
7/14/2010 10:11:00 AM by Tara We got the door in, had some breaks, did some 'real' work, now we tie up the loose ends and get ready for the insulation sprayers to come and spray - this means making sure the outlets are in, clearing the spaces in front of the walls etc.
Also - we are going to tear down the fascia boards and put up new ones.
6/30/2010 8:23:00 AM by Tara We started tearing into the hole in the floor by the dining room door. The problem was a lot worse than we thought. The rot extends the length of the door, at least a foot back from the door almost the entire length of the door. We found some wasps. We are going to work on this more today.
We have a video for this one.6/27/2010 10:34:00 AM by P.J. It is difficult to rewire a house. The difficulty stems from several factors. First, the wiring is usually in difficult to reach places: behind drywall, in the attic, under the floors. If you are going to rewire a house, you have to remove the wall covering and venture into cramped and often very hot places. In an Oklahoma summer, it's only possible to get into an attic at night or in the early morning, so there isn't a lot of time to work.
Second, you have to pull the wires through tiny holes and across the house from the breaker box. Copper wire may not seem like a difficult product, but 250 feet of it can be quite heavy. Carrying it in a cramped attic is hard because you have to maneuver over ceiling joists and duck rafters holding up the roof. You have to be careful not to rip the vinyl on the wood beams in attics or when pulling it through and around corner studs.
Third, it is a mental challenge. When you are rewiring a house, you need to plan thoroughly. Where are you going to put the outlets? How many outlets can you have on one circuit? Do you have enough room in your breaker box to accommodate the electrical load? How are you going to wire switches and/or outlets together on the same circuit?
Fourth, it takes a long time. It can take 30 minutes or more to rewire one outlet. It takes an hour to run a new wire across an attic or under the floor. You have to staple the wires to studs, strip wires, screw them to terminals. If you have to break into walls and ceilings to mount receptacle and switch boxes, you'll need to repair the damage later.
Fifth, it is scary. You really need to research and understand the problem and solution before you begin. If you make a mistake, you can shock yourself or die. After you've wired the house, a mistake could lead to a fire or shock hazard to yourself or your family. Get the right tools and do the job correctly so you minimize risks later on. There are circuit testers that you can plug into outlets to make sure they are wired correctly. They only cost about $5 at any hardware store and are well worth the money.
Sixth, it's expensive. Factor in all the costs you'll incur. A new breaker box is about $100. A GFCI outlet costs $10. You need them in all wet areas: kitchen, laundry, bathrooms and outside. Copper wire is $70 for 250 feet of 12-2 or $120 for 250 feet of 12-3. The costs can add up.
Seventh, it's dirty. The attic in our house is full of blown cellulose insulation and when I go up there and I'm sweaty the dust sticks to me. I come down looking like I've wallowed in a pig pen. Make sure you wear proper respirators, goggles and gloves to protect your health. I use a headlamp to free my hands to work in the dark areas.
So the difficulty in rewiring a house lies in the triple whammy: it's mentally, physically, and financially challenging. But it is also rewarding. Electricians make a lot of money for a reason.
You can do a lot of the work yourself and hire an electrician to come and do the rest. From what I have seen, the electricians who originally wired our house, or have rewired portions of it, didn't do that great a job. I know, because the circuit testers say the three pronged outlets aren't really grounded or the hot wire and neutral wire are switched. There are wires taped together without wire nuts and junction boxes to protect them from ware.
I'm not an electrician, but I know the work I'm doing is better than what is there now. As I continue to rewire my house, I read more books, I learn more, I research on the internet. As I work my way through this job, I learn better because I have a base of experience to help me understand what I'm reading and put it into context.
If you want to do the job right, stick to the NEC -- the code. The code has been built up over decades of trial and error. The insurance industry built the code originally because they wanted to make sure the homes they insured weren't going to burn down or hurt someone. Remember, the codes are the minimum, understand how to make your home even better than the code.
Take your time. If you are unsure of something, don't just wire it. Consult a book or leave that part of the task until you come across the answer. Look on the internet, but be careful what you read. It may be old and out of date. The NEC is updated regularly. Rewiring a house is something one once every few decades, so do it right. Don't rush. Don't do things incorrectly because you just want to get done. You could end up paying for it later with a burned down house.
Understand your fear. If you are afraid, it is because you don't know enough. Read and learn and research until you are confident -- not arrogant. Arrogance will get you killed when working with 240 volts of electricity.
What I say here may not apply to you. I have a background in computer engineering and circuit design. Proceed at your own risk -- or someone else's.
6/23/2010 9:59:00 AM by Tara After two months at Grandma's and a half hour commute each way to the house any time we wanted to work on it, it's time. Time to start living at the house. First off - in order to beat the heat (mid 90s Fahrenheit - low 30s Celcius), there are some tasks that we need to do at night or very early in the morning before it gets too hot - eaves and overhangs and going in the attic so we can finish the wiring so we can get the insulation in.
We've spent the past week preparing mentally and physically to move in. All of the deconstruction has been done - no more walls to tear down, no more carpets to tear up, no more ceilings to scrape. The rest of the messes will be easy to contain:
tasks such as
fix floor by door and
install sliding glass door. The dust levels are down and the dwelling is semi-habitable. The past week has been about:
Insurance, rejectedSince we're investing in this house, we want to protect our investment with insurance.
Geico quoted us $9000 a year. PJ's mom was paying much much less than that, and most people we talk to around here seem to be paying less than $1000 a year. We went over to the
Farmers Insurance branch near here and talked with a very nice and rather hilarious employee (one of those inspiring people that is upbeat despite a physical disability). He got us a quote for $573 a year (mind you with a very high deductible). When his boss came back to town, we got a rejection call. They sent our cheque back with the note "rejected - lapse in coverage over 12 months". Hmm. So we can't get insurance, because we didn't have insurance? They said they'd be able to insure once the yard was cleaned up and we repair the
Eaves and Overhangs. I tidied the yard. So we'll also make that a priority. It's funny that the exterior of the house, something quite superficial really, determines whether or not we get insurance.
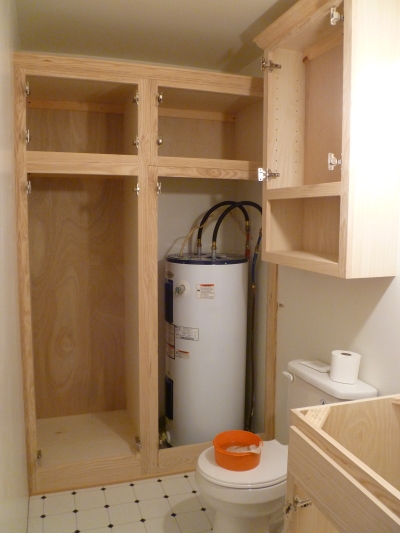
LivabilityWe purchased the water heater and had it installed Monday (okay, so it's not working yet, but maybe we'll talk about that later). It's so hot that we have already each had a splash bath without hot water and it actually feels gooood. The water doesn't get that cold.
We bought a fridge. And some groceries.
We built a temporary support for our lovely Corian countertop.
We took the air mattress out and bought some rugs to lay it on (in case of snags from the floor).
Now for some errands in town, then we'll be out there for the first time tonight! Wooooo!
http://c1623182.cdn.cloudfiles.rackspacecloud.com/9dcf55a2-f83a-4530-b99a-377dd2b5a337-bath2-floorglue.jpg
6/14/2010 11:44:00 PM by P.J. I didn't realize how long it takes to rewire a house. There is so much planning to do. I went up in the attic again today and ran three wires for the kitchen. Two 12-2 wires for 120V circuits and one 10-3 for the stove. I also removed some old cloth wrapped wires. Tara said she wanted to make a basket out of them. I think it'll look great. There will be plenty of wire for it.
It can be really difficult to imagine how all the electrons are going to flow through the wires. I recommend drawing out the circuits before you start. It seems simple at first, but wiring two lights, two switches, one GFCI and 3 regular plug-in outlets on one circuit is pretty complicated. I've been visiting lots of websites, reading books, and looking at wiring diagrams and it's still complicated to imagine. most of the books only talk about how to wire a switch or an outlet or a light and a switch, but not a whole circuit that is a combination. It's a lot like programming in a way.
Just taking it one step at a time. It seems easier to start with the last outlet on the circuit and work towards the breaker box. Leave lots of extra cable so if you make a mistake there is some to spare. Get good wiring tools -- lineman's pliers and wire strippers especially. Regular wire cutters aren't strong enough to cut 10-3 wire cleanly, but lineman's pliers can. Also, lay out all your outlet boxes so you know where the circuits are going to be. Do it in the room you are wiring. Plans are one thing on paper, but when you are standing in the room, you may reconsider where you put the outlets and switches.
6/8/2010 10:45:00 AM by Tara Insulation will now go on outside wallSince our last update we have changed the insulation plan. We were originally planning to insulate the walls around the main area of the house with the living room, kitchen and dining room. This would have involved insulating two exterior walls and two walls that bordered inner walls. We decided it makes more sense to insulate the exterior wall of the big room, since we want to take that paneling out eventually anyhow. So we started taking out that paneling. We've got some vids of this that I'll upload soon/eventually.
MalathionWe took the carpet out of the big room/future workshop and I found a source of one of the rank smells that has been plaguing the house since well, since I first set foot in it. There was a jug of the insecticide
malathion. It smells like a cross between a dead animal and sewer gas. Very glad to get that out of the house.
GroundingOn Sunday the husband of a lady PJs mom used to chat with on the porch (they lived across the street from the house in the early 80s) came by and installed a grounding rod with PJ. He's an electrician and it was pretty awesome that he helped with this. Oklahoma has a lot of really nice people.
Re-installing wiringArmed with our circuit map, we were ready to start pulling wires and replacing them. A few of the circuits have GOT to go - they are very thick, covered in cloth and a few of them are frayed where they go through the 2x4s. We wanted to change the way the circuits run too. Some of the way they did it didn't make a lot of sense. We definitely need another circuit in the kitchen. It had one circuit for all receptacles, with the two additional 110 volt circuits running in to power the stove/cooktop together. We have two spare slots on the circuit breaker, so we will add a new 240 volt circuit for the stove. Also need an outlet for the vent (vents are good - especially if you like to cook Indian food like curry). We will use the two circuits that used to go in to the stove for the rest of the kitchen outlets. The electrical books we are reading say it's best to have three circuits in the kitchen, including one for the stove.
The ceiling incidentTo get started on the re-wiring job, we pulled the old cloth wires out of the kitchen, and through the hollowed out walls to where they enter the part of the house that is drywalled - we're not going to tear down those walls. No way. So at this point we went into the attic to look at the top of the circuit breaker (main switch off for all electrical work). Its such a mess up there, it can give you a headache just looking at it. We're not sure why, but at some point the ceiling in the house was lowered. Why would anyone want
lower ceilings? Anyhow, so up in the attic there is a second layer of ceiling beams and there is drywall attached to the beams - about 1/3 or half of it has fallen down and is resting on the cellulose fluff insulation that covers the current ceiling. Where it has not fallen down it is very hard to see things and move around. The area between the attic entrance and the top of the breaker box was hidden by this layer of drywall. I was up there tearing out the drywall and I fell through. I used my killer instincts to grab the ceiling beam and PJ was standing at the circuit right below me and he grabbed me and everything was fine except for the giant mess I made. Really if I had killer instincts, I wouldn't have fallen at all.
The battleIt feels like this house is out to whoop our butts. The battle is on, we are going to get it. We are going to finish it and make it nice and there is nothing the house can do about it!
6/3/2010 8:18:00 AM by Tara Today we had two tasks on our list:
Wipe out wall cavities - kitchen and
Wipe out wall cavities - living room TaraMap Circuits P.J.Wiping out wall cavitiesThere was a lot of gunk on the wood plank sheathing where we will have insulation sprayed: mud from
Mud dauber wasps who had presumably crawled up from under the vinyl siding outside and in through cracks in the wood plank sheathing and built many nests between the walls, dust, spider webs, spots of mildew and mold and other unmentionable things. I used a solution of water and bleach to wipe them off (an eighth part bleach). It was a dirty smelly job, but the walls do look better and I know that I will feel better about having spray foam insulation blown in on top of clean walls.
Making a circuit mapIn one of the electrical books (
Basic Wiring and Electrical Repair from Black and Decker), it was suggested than when moving into a house or planning electrical work, one map out the existing circuits.
Seemed like a thankless task, given the tangle of wires from different eras that lines the walls of the old house. I drew out a map of the house and drew in all of the light fixtures and outlets I could remember the locations of. PJ drew in the rest of the outlets on the map and figured out how we would go about testing the circuits - this involves turning off all of the circuit breakers, turning one on, and seeing which outlets/light fixtures turn on when that circuit is on.
Most of the house was easy. The fact that half of the walls in the house are 1/2 there right now helped, as we could see the wires snaking from one set of outlets to the other. We went through and did the lights first, which was easy because most of the lights in the house were on one circuit. Because I was working on wiping down the wall sheathing in the living room, we used a lamp (that we made sure was in the on position with a working light bulb) to test those circuits and I would simply yell out "on" when the light came on. For the bedrooms, which were close to the circuit breaker, PJ used the lamp. For the big room way far from the circuit breaker, PJ plugged in a vacuum to the different outlets so I could work on my task and PJ could hear if a circuit was on when he flipped the breaker switch.
Today we have to figure out where we want to install new outlets and where we want to put appliances.
5/30/2010 10:10:00 PM by Tara So the last few times we went out to the house, we've been sort of at a loss for what to do out there. We ordered new windows last week, and we're going to be waiting for them for a while. We've been wanting to paint all at once, so we don't have to lose paint and waste paint by painting on multiple days and washing out the brushes multiple times, but it seems like there is not a lot else that we can do.
So I went through the
tasks in calendar view in dragged and dropped them into a general order. We can't put the insulation in until we get the windows. We are having someone come in to do the insulation, but that can't be done till the windows are in. I checked
Lowe's order status page (very cool, wish I had seen this on the receipt last week) and saw that the windows are expected to be ready as of June 10th. So the general order I was working with was things that can be done before the windows are installed, and things that can be done after the windows are installed.
There is one side of the house that won't be getting an windows (yet) or insulation, so because we have our own sander now (and do not have to do all of the sanding on one day with a rental), we can do painting, sanding and baseboard installation all before the windows come in. We can also prepare the area for water heater installation and do some electrical tasks like grounding the boxes, checking for circuit capacity.
That should keep us busy for ten days!
http://c1623182.cdn.cloudfiles.rackspacecloud.com/fe3e0552-410c-44b0-9b79-2f11921bcd38-EarlyJuneTasks.png
5/27/2010 12:41:00 AM by P.J. Item % Total
Permits 2% $80
Demolition 2% $80
Framing 2% $80
Plumbing 2% $80
Electrical 2% $80
Insulation 2% $80
Drywall Patching 1% $40
Flooring 5% $200
Cabinetry 50% $2,000
Countertops 20% $800
Backsplashes 2% $80
Appliances 6% $240
Fixtures 1% $40
Design 2% $80
Paint 1% $40
Total 100% $4000
Seems like $240 isn't really enough for appliances. Half the money is going to cabinets and countertops, which I suppose seems logical. Perhaps if we reuse a lot of the gear we removed, it'll save us some money. I suspect building is the lowest cost option, but everyone tells me it is very difficult to do.
5/22/2010 11:34:00 PM by P.J. Tara tested painting on one of the removed boards. Looks best sanded then killzed then painted. Of course the method with the most work looks best. Scraped dining and living. Tested stain and wood filler. Took cabinets outside. The house did smell better today. Measured the kitchen. 121 inches by 143 on living room wall. Swept and vacuumed. De-nailed the living room a bit. Picked at paper on floor. Sanded dry wall in bathroom. Chatted with an old neighbor Robert who volunteered to help ground the house with a grounding rod he has at home. Great news there.
We are almost ready to start painting. Can't wait.
need a better interface for mobile devices.
5/21/2010 9:10:00 PM by P.J. Saw an ad on Craiglist for lots of tools in Muskogee, so I stopped by and got an air compressor with a hose, a few sanders, and a palm nailer. I was excited about the air compressor until I found out it was a cheap brand called Central Pneumatics which is a rip off of Chicago Pneumatics which makes good air tools. One of the electric sanders I got was a Chicago Electric, which is also a cheap brand from Harbor Freight.
There was a lot of air leakage around the connections on the air compressor and my heart sank a bit wondering if I just got a bunch of junk. I thought I may be able to salvage it, so I took the connectors off, stripped the Teflon tape and put a new layer on, then reattached everything. Brought the machine back up to pressure and no leaks, so I was happy. Online reviews and my aunt both said not to run them too long and let them cool off regularly. Keep them oiled well and they should work all right.
I hope to sand the floors with the sanders, build the chicken pen with the palm nailer. I also got a table saw and a drill press from my aunt Sue and I think I'm set for the summer. I have everything I need to get the house in order to live in or sell.
I suppose it's not such a bad idea to get good deals on some cheap tools for my first go around. I'll learn what I like and don't like, then I can spend good money building a set of tools. My goal with these is to get through the remodeling of the house and maybe even sell them with the house. I'm not sure if I will want to take everything on the road or not, if/when we move back to Vancouver. It may be better to travel up on the cheap and buy everything new. It'll depend on what the moving costs are going to be and we may not even have space up there to bring a lot of stuff.
We unloaded the tools from the truck, then Tara scraped the kitchen ceiling and I put the second coat of mud on the bathroom. It's ready for a light sanding and painting. I want to get a paint gun kit from Lowe's and use that. We have about 6 rooms to paint, plus the whole outside of the house. I think $55 for a paint gun isn't bad if it'll save us a lot of time. I think it will!
Update
We called Lowe's and the paint spray kit is actually for cars. We did some more research and watched some videos and a lot of them said that because of the fine mist that is blown everywhere with a paint gun, the prep time takes almost as long as the time that is saved, so we went back to thinking we will paint with rollers.